Welcome to Eye on Cutlery...
Here you will find articles and reviews of products that I have featured.
You will also find the odds and ends that I want to post,
Enjoy,
Marion
marion.poff@gmail.com
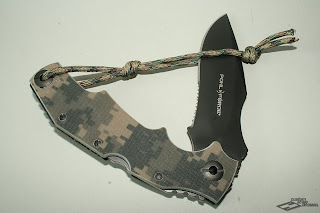
If you are interest in the Spyderco Mule Team Knives, be sure to check out the blog I have dedicated to this subject at... http://muleprojects.blogspot.com/
And, if you would like to see my Custom Concealex sheaths, check out... http://marioncarry.blogspot.com/
Monday, December 28, 2009
Monday, December 14, 2009
An article I wrote some time back, about making fire with a Ferrocerium Rod.
Ferrocerium Rod Fire
These days, many people find themselves recreating in the great outdoors. And just as there are many ways to enjoy yourself, there is always the chance that your adventure could take a turn for the worst. Whether you plan to spend the afternoon out or commune for a week, whether you hike or mountain bike, snowmobile or ski, you need to prepare for the chance that your outing could include an emergency.
Prudent preparation will naturally include a first aid kit, and some sort of emergency necessities kit. Of course, having studied wilderness emergencies, your kit will include three different methods of starting a fire, obeying the rule of three. And along with some sort of knife, like a Swiss army knife, or Leatherman-style multi-tool, carrying a tool to start fires provides a firm foundation for your kit.
Common tools for starting fires have their failings. Matches get wet, crushed, break, or you run out of them. Lighters run out of fuel, break, get flooded or simply do not work at higher elevations. These disadvantages warrant the investigation of other firestarting tools. Because, of all the tools that you take into the wilderness, the one that starts your fire is one of the most important. And of all the alternates, the ferrocerium rod may just be the perfect tool to replace these less than ideal tools, and the ferrocerium rod is definitely a tool to round out your roster of firestarting methods.
Now, when you hear of a ferrocerium rod, you may wonder, what does this have to do with fire? The answer is that ferrocerium is one of the foundation substances in modern fire. The sparks in your lighter, or your furnace, the sparks that light your lantern, all are most likely created by a bit of ferrocerium. It may be hidden, or too small to be noteworthy, but ferrocerium is usually the source of that spark. Ferrocerium rods are sometimes identified as a 'flint' or as a 'metal match', as well as a number of brand names. For the purpose of this article, I will abbreviate the name, as you will find in some references, to 'ferro rod'.
In use, the ferro rod is scraped to produce a spark hot enough to ignite appropriate tinder, even in less than ideal conditions. Conveniently, most ferro rods are of a size that accommodates their use for years, while being small enough to carry without undue concern for weight. Ferro rods are resistant to being broken, especially in the larger diameters. And for the purposes of emergency preperation, one of their most important features is that they are waterproof, functioning once the surface water is removed.
The most common method of using a ferro rod is to scrape the side of the rod with a piece of hard metal, like a hacksaw blade that has been modified by removing the teeth or a scraper manufactured specifically for the task. While many ferro rods include a striker, some do not. In that case, just about any hard sharp edge, such as a rock or a piece of glass can be used to produce sparks, though you will likely find improvised scrapers to be less effective. Your knife can also be used to scrape the ferro rod.
The scraper is stroked along the length, the scraping separates bits of the rod, and the friction ignites them. The sparks created are very hot, 1200* F, and ignite the tinder you have prepared. Most commonly the ferrocerium rod is held stationary with the end in the tinder and the striker moving downwards. Alternately, Jeff Randall of Randall Training Adventures tells of a method where the striker can be held stationary, and the rod is put in motion. He advises that it is a good method for when the down stroke of your striker may scatter your tinder or extinguish the tiny flame. In the case of an injury or other mobility impairment, the second method may work better. A knife or axe can be stuck in a log, and the flint can be stroked along the edge, showering sparks into your tinder. The second method also works when using an improvised striker, which may be hard to control, such as an axe or machete. In my use of the various ferrocerium rods, I have found moving the striker sideways while downward helps to create a bigger spark, almost as if you are sawing a spark off. Another consideration is the size of the rod, generally, a larger ferro rod will allow more contact with the scraper, thus, more sparks.
Many of the commercially available ferrocerium rods come with magnesium, included to help start your fire. While appropriate tinder will light with only a spark or two from the ferrocerium rod, some, like Chris Janowsky of the World Survival Institute, choose to have the magnesium available for times when the tinder is damp. They advise to build a pile of magnesium shavings, place your tinder over top, and light the magnesium. The rising heat from the magnesium burning at 5400* Fahrenheit will dry and help ignite stubborn tinder.
When speaking of carrying the various firestarters, I would like to stress the importance of having your fire-starter with you at all times. To accomplish this task I like to replace the usual leather cord with utility cord. Putting the utility cord in allows a lengthening of the cord, making room for a loop so that you can secure the firestarter in such a manner as to have it with you at all times. Remember while it is possible that you may still have all your rucksack with in an emergency, it is also very possible that your emergency may consist in part, of missing or lost gear, and in that sort of situation, what you have on your person may be your only hope.
Beyond how to employ a ferrocerium rod, and techniques for best results, let us discuss the commercially availabe ferrocerium rods...
The ferrocerium rod from Simply Survival is simplicity itself. It consists of a 3/8 inch diameter ferrocerium rod drilled to accept a cord, a hacksaw striker, and a leather cord to string between the two. Of all the different offerings, this is probably the one I like the most. I found that due to its simplicity, it was the tool I reached for, it throws a large spark that will light any properly prepared tinder of appropriate composition. And speaking of appropriate tinder, Greg Davenport of Simply Survival, in his book “Wilderness Survival” explains “Tinder must have edges, air and be dry” Edges to catch the spark, Air to circulate and feed the flame, and be Dry enough to light.
Chris Janowsky of the World Survival Institute offers the Hot Spark P-60. The Hot Spark performed very well, throwing a really good spark. It also has a couple of features that make it very user friendly. The ferrocerium rod and magnesium of the Hot Spark are mounted in a wood handle, which provides a good hold. As well, the end of the wood handle nearest the rod is angled to put the flint rod right over the tinder at a convenient angle. And in an emergency, the wood of the handle can be shaved for tinder. As a plus, the P-60 comes with a belt sheath. WSI also offers a number of other models, including one exactly like the P-60 with the addition of a ceramic sharpening rod and simple models consisting of the ferrocerium rod and magnesium drilled to go on your key-chain.
Mag/Flint FireStarters offers two styles of fire-starters. One style consists of a flint rod epoxied to a magnesium rod, with a handle of antler. The antler is drilled to accept a leather cord to which a hacksaw striker is attached. These antler-handled fire-starters were very comfortable to use. The other models are without handle, meant for key-chain use, so that you may never be without the means of starting a fire. Both styles come in different sizes, and all of them accomplishing the task of starting a fire. Linda Potter, the Mag/Flint FireStarters headlady, recounted to me the numerous times she had been thanked, her firestarters having come in handy and in some cases saving lives. These stories highlight the importance of having the capacity to make a fire with you at all times.
Strike Master Survival Tools offers three different styles of flint rod based fire-starters in multiple sizes. The key-chain style in the model sent to me, is combined with a neck strap and whistle making a sort of self-rescue set, excellent as an introductory preparedness gift. And if you did not care for the neck lanyard and whistle, you could simply add the leather pouch containing flint rod, magnesium and striker to your key-chain. The H25 has a well-sized wood handle, positioned at the end of the flint rod and magnesium, making the tool very comfortable to use, and perfectly sized for wearing in a belt sheath. The P25 is also handled with wood the flint and magnesium end to end, epoxied to the wood handle. The P25 is a slimmer package, perfect for slipping into your pocket. Both the P25 and the H25 are drilled to accept the included leather cord and hacksaw striker, and in an emergency, the handles of both being wood can be scraped to provide tinder in an emergency.
Ultimate Survival aka Survival Incorporated offers the Blast Match and the Strike Force. The Blast Match was specifically designed to be used one-handed. And it works exceptionally well, throwing a shower of large, hot sparks. One consideration with the Blast Match is that it needs a firm surface to pushed against, when used one-handed. The Strike Force consists of a ferrocerium rod in a hardy plastic sheel, one end holds the rod, the other end holds the strkier, and they are held together with a nylon cord when not snapped together. The Strike Force is also unique among the various firestarters, it has a space for tinder to be stored. The Strike Force is the largest of the reviewed tools, perfect if you want an easy to grip package.
Light My Fire of Sweden offers the FireSteel in two sizes. Both models share a plastic cap/handle that bears a lanyard hole for attaching the included striker to the FireSteel with cord, also included. The larger model, known as the Army, is a 3/8 inch flint rod, and it comes with one cap color, black. As I understand it, the Army model is in use with the Swedish military, which does not surprise me, the large rod throws an excellent spark. The smaller model, the Scout, is the same as the Military, except with a thinner flint rod and is available with different colored caps. I found the Fire Steels to be convenient in use, the cap providing a good hold. I think both styles of FireSteel are a good value, simple and effective. The Scout model may just be the perfect ferrocerium rod for the minimalist hiker that wants emergency fire-making capability without 'excessive' weight. MagFire offers a similar product, comparable to the Scout model. And if you are looking for a ferro rod with a handle in the shape of a flame, check out
Last among the flint and magnesium tools I will mention the standard block of magnesium with a ferrocerium sparking insert. This tool is sometimes known as the Doan tool, after the name of the company that makes them, Doan Mfg. This firestater is commonly available from Coghlan’s in many outdoor and sporting goods stores, and sometimes at your local army/navy surplus. Commonly available and simple, it will accomplish the task of starting a fire, though you will have to provide a striker.
Finally, I would like to deviate slightly and mention, the Spark-Lite from Four Seasons Survival. This is really a system, not just a ferro rod fire starter. The Spark-Lite, is a plastic body, the size of four common wood matches, with a wheel similar to what is on a lighter, the wheel strikes a bit of ferrocerium when you rotate the wheel, throwing a small shower of sparks. The Spark Lite comes in a plastic box that also contains 8-10 FireTabs, the FireTabs are cotton soaked in a mixture that makes them very water resistant, as well as quick to light. The box is small enough to fit in a pocket, perfect for hip pack kits and such. In use, the Spark-Lite very quickly lights the FireTabs. This system seems the best to me for those who would practice little before they needed their firestarter, or for those who prefer a compact system. Among it’s advantages is that it can be used one-handed, and it functions once any water is blown out of the action.
The ferrocerium rod, in its various forms, is one of the best tools available for starting a fire in the wilderness. The ferrocerium rod provides a durable, long-lasting, effective fire-starter. When trekking into your next adventure, take a ferrocerium rod along with you, you will only be safer and more comfortable for doing so. And remember, practice before you need it, and you will be ready when it counts. “Hope for the best, Prepare for the Worst.”
A note of caution, if the edge of your knife is all you have, then by all means use that, but if the spine of your knife is available that would be preferable since the heat of the sparks and the metal of the ferrocerium rod may blunt or dull the edge of your knife. If you decide to use the edge of one of your Swiss Army knife or multi-tool implements, be careful to remember that it folds, and you don't want it folding on you. As a final note of caution, remember that you are working with fire, which can be very destructive if left to it's own devices. "...fire: a dangerous servant and a terrible master". --George Washington
Marion
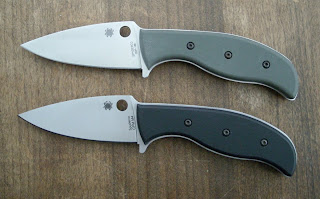
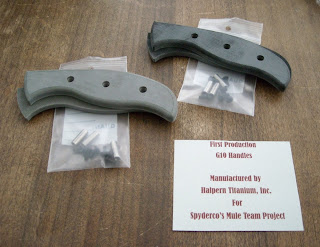
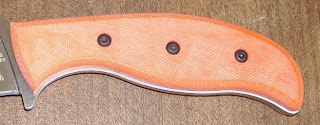
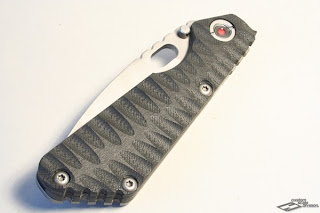
Precision Grips from Halpern Titanium for the Spyderco Mule Team Knives
Halpern Titanium manufactures Precision G-10 Grips for the Spyderco Mule Team Knives.
Halpern Titanium, of Three Rivers Massachusetts a long time partner of Spyderco, met with the Spyderco Team in Golden Colorado some months past. At that meeting the Halperns were asked by Sal Glesser to turn their expertise in precision manufacturing to the task of building handles scales, or grips for the Spdyerco Mule Team Knives. And Halpern Titanium decided to offer a Mule handle scale, as it was a great opportunity that fit with their manufacturing strengths and represented another great way to collaborate with Spyderco.
Knowing nothing of this, I saw Sal mention that Halpern Titanium were looking into making grips, in a thread at BladeForums and as I have a deep interest in such things, I contacted them. Their response was swift and communicated a real enthusiasm for the project.
Within a couple days, they announced on their forum at the Usual Suspect Network that they would be making grips for the Mules. This announcement was met with real interest, as to date, they are the only company making a 'production' handle scale for the Spyderco Mule Team Knives. Within a short period, a sign-up for 20 sets was announced and sold out.
A few weeks passed, until an opening in their production schedule came around. Then, the announcement was made that they would be offering two different grip options. Option 1, dubbed, 'Ready to Use', are grips and hardware that allow the owner of a Mule, to buy handles for their Mule, install the grips in a couple minutes and then be onto the serious business of enjoying their knife, fully functional with handles. Option 2, dubbed, Do It Yourself, are grips machined for hardware, and with the perimeter or 'profile' cut, but allowing the customer to finish them in a any shape or texture that they would like. Announced at the same time, that they had decided to manufacture more than 20 sets, because they wanted to be able to offer the grips to the wider market.
Then came the day of their arrival....
We had a decent snow here, so it was a bit like Christmas. I woke up, and looked outside to find my mailbox full and my yard covered in snow. I made myself do the responsible thing, and shovel the walk first, then I could sort through the mail.
Just as I thought, the Mule Grips from Halpern Titanium were there.
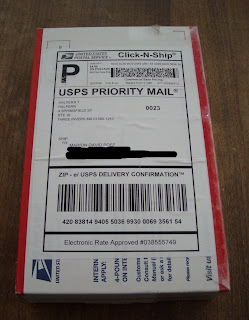
And upon opening the box, I found all the contents very nicely wrapped and packaged, you could even say that they were lovingly packaged, with double bubble wrap, just to make absolutely sure that they arrived safely.
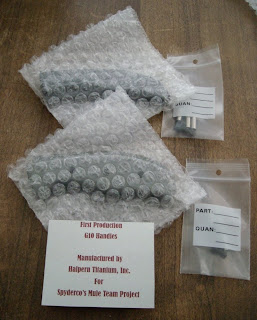
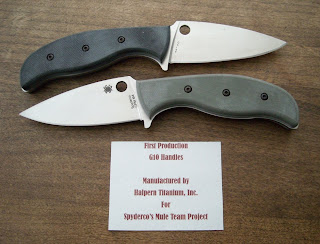
And, after separating the grips from the packaging, I was ready to go find everything else....

So, I assembled all the tools necessary, my favorite being the Husky Tools Torx Driver with all the different sizes. I also, dug through boxes to find my Spyderco CPM-M4 and ZDP-189 Mules.

Assembly went well, after just sort of going at it, I figured out that it was easiest to fasten one screw to each spacer, line one grip up with the holes in the Mule, and push the spacer with attached screw through. Then, I could hold the grip on, while placing the second grip on the other side, over the spacers. Then it was simplicity to finish the job by adding the last screws.
But, then, when I went to place the grips on my ZDP-189 Mule, I found that there was small amount of slag in the hole, that kept the spacers from going in with hand pressure, so for the sake of images, I just put those scales on my 9Cr18Mo Mule, which proved no challenge.
Later, I spoke to one of my brothers, who is much better with tools than I am... He suggested I use a hammer, and try to coax the spacers through the holes. He has a great deal of experience with such things, as he is a mold cleaner and process tech for the plastics industry. Having been given good advice, I was still a bit hesitant, because the ZDP-189 Mule is know for it's high hardness. But, starting by placing the Mule on a towel, I got the spacers into the holes with the hammer, taking care to keep the force low. Then I went out to the shop, and placed each spacer, one by one, over a hole in a piece of wood, and applied the hammer. Worked like a charm. Then, a small session of grip swapping began.
As people have seen and read more about this run of grips, there has been some concern raised about the fact that the grips do not extend out to the edge of the tang, that they are not the same size as the tang of the knife. My opinion is that given the manufacturing options Halpern Titanium was faced with, the solution they chose is a fine alternative, perfectly functional, and quite a bit less expensive than a custom-fitting.
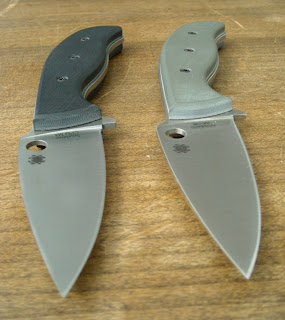
In this situation, there are three choices a manufacturer of after-market handles for a full tang knife can make.
1. They can try to match the contours of the model as perfectly as possible, but given natural manufacturing tolerances, the grips will not match exactly. This is due to the fact that both items, the grips and and the tang of the knife can vary. This makes for a very inconsistent looking product.
2. The grips can be made larger than the tang, but then, the purchaser has to 'fit' or modify the scales to fit his knife. This makes the product a DIY project, which is the not the purpose of this option. Many customers do not want a DIY project, they want to bolt grips on, and use their knife. Honestly, I prefer a bolt-on and done product to one I have to modify before I can use. Some people are prepared to modify a product before they can use it, but I would hazard a guess that most are not.
3. Or, they make the grips smaller than the tang, which gives a finished appearance, and makes the product ready to use. This method has a strong following in the industry, being used by Chris Reeve, Benchmade and others.
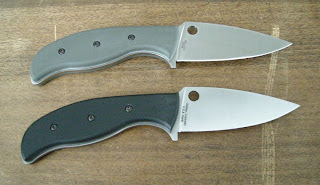
I have found that having the tang proud of the handles is really no pain. The quarter inch thick scales fill the hand, and generally mute the effect of the tang sticking out. Ironically, a friend of mine came over, and I was filling him in on what was going on, and the new grips from Halpern Titanium. He picked up the knife, and said... "Oh, this is really nice. These new handles feel really good. Phenomenal!" Then, I pointed out that the handles were not flush with the steel. He had to pick the knife back up, look at it again, and said "No, what? These are great, I didn't even notice, with the way these handles fill your hand. In fact, I like the way these look. The way you can see the steel around the edges of the handle scales, really sets the handle scales off."

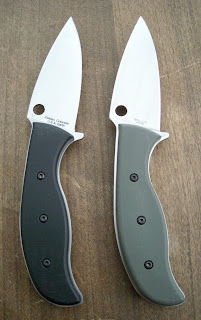
When they arrived, the grips were a bit pale in color. I believe this is partly due to a lubricant used in machining. Also, as a surface effect, grips such as these made of G-10 or micarta, tend to look a bit better when oiled. A common practice among knife-makers is to oil micarta, for a slightly darker appearance. This also happens naturally, with exposure to the oils of hand, with use, over time. Note - In a later conversation with Marianne of Halpern Titanium, she confirmed that it is common to oil the handles, and makes for a richer color.
As I have handled the Mules, and they have darkened with use, I really have to say that I like the color. I had expected the Strider Ranger Green to be a bit darker, but I like it.
I am very pleased with these grips. I find them to be functional in every practical way. Halpern Titanium has succeeded in providing an inexpensive and practical production handle scale option for the Spyderco Mule Team Knives.
And when you consider value, they are quite an attractive option. The least expensive Mule was $20, but the average cost for one of the Mules, has been $56, which makes the G-10 grips from Halpern Titanium pretty cheap at $25. And, with the grips being inexpensive, it makes it attractive to order an extra pair for future Mule knives, remember, we are just getting started with these Mules. I wish I had purchased a set of the Coast Guard Orange scales, as well.

If you are interested in purchasing a set of grips, in either option, please contact Melanie of Halpern Titanium at 413-283-8627, as I understand it, they have grips in stock, shipped for about $30. They had planned on making only 20 sets of handle scales, but they decided to expand the run.
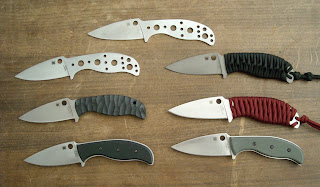
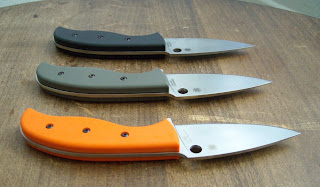
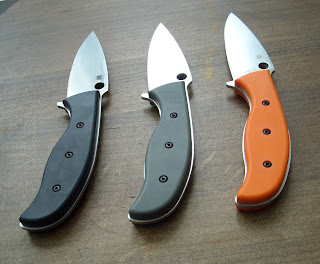
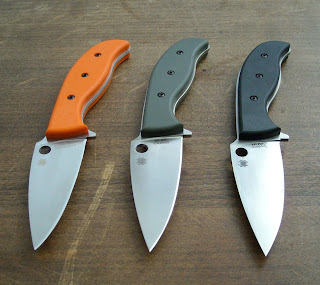
And finally, just for fun, I took a group picture of all my Mules, with their handles.
Marion
PS - If you are curious about the hardware that these grips are mounted with, I have a couple images here..... http://spyderco.com/forums/showpost.php?p=544132&postcount=23
Part II
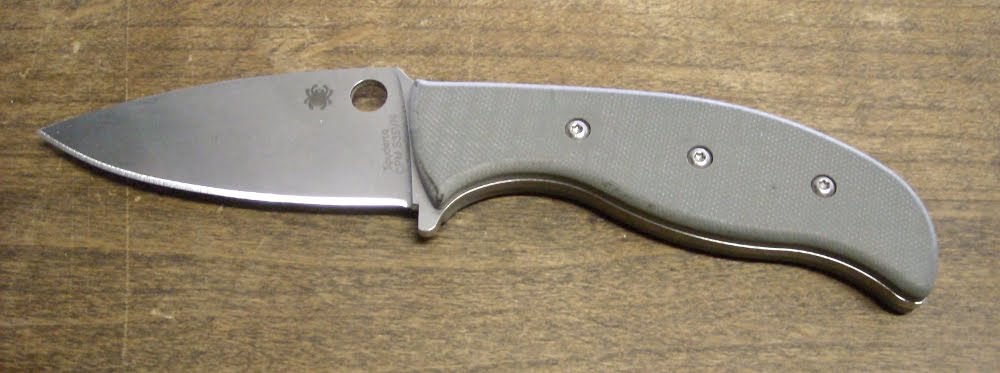
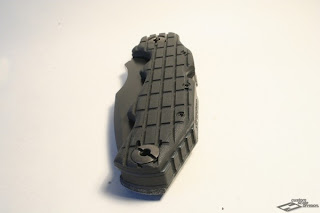
Oil your G-10 grips for best appearance.
As you may have read in my review of the Halpern Titanium G-10 grips, I mentioned that they were a bit pale in color at first, and that over time, with exposure to the oils of the hand, they would darken up. I also reported that some customer makers oil their G-10 and Micarta with Mineral Oil.
Here I have borrowed an image from my review, for this this article. It shows the pale color of the surface.
After reading my review, Marianne Halpern of Halpern Titanium confirmed that the grips would benefit visually from an application of oil, and she suggested a product called LPS TKX or the old standby WD40.
So, I decided to get some oil, and see how it worked. At the time, I was anticipating the arrival of a pair of Coast Guard Orange G-10 Grips from Halpern Titanium. I had not bought a pair of the orange, and then they were sold out, and I decided I wanted a pair. Then, a Spyderco.com Forum member, by the name of David, told me that he had bought a set of the orange, but that he was willing to part with them. And so, a deal was struck, and I waited for their arrival.
But, while I waited, I went looking for Mineral Oil.
First of all, I knew that Mineral Oil has in the past been used as a skin softener or conditioner. A jaunt over to Wikipedia will show that it's use is far more common than you might be familiar with, and that it is a close relative of white petrolatum.
So, I went to a couple stores, and after spending far too much time hanging out in the health and beauty area of my local market, stuck behind women gossiping about plucking, hair color changes and what they were to wear at their upcoming Christmas festivities, I was diverted to hardware, where I had to explain that while mineral spirits may have the word mineral in common with mineral oil, that was not what I was looking for. Strike One for Marion.
Then the day after Christmas came, and my wonderful partner and soon to be wife, needed to go shopping for supplies for our upcoming celebration. And among our adventures, I had some time at Wally World. After wandering through hardware and picking up a few things, I got focused, and headed over to the area around the pharmacy. There I found the staff very helpful, and I found a bottle of mineral oil, and at a very fine price.
Fast Forward to my return from the country, to my home, where I discovered that my Halpern Scales were waiting for me....

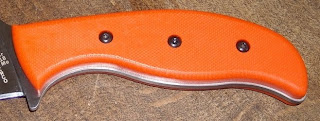
And, even more so than the Strider Ranger Green or the Black scales which I had already, the Coast Guard Orange grips were in need of a bit of oiling, being pretty pale, and not very rich in color.
Soon, I had very soft hands, thanks to mineral oil. And my Mule grips are wonderfully rich in color...

And images with a flash, for a bit more of the story...
Before
After
And finally, the best part of using mineral oil for this purpose is that it is, by all indications, non-toxic, and seemingly odor-less. Neither of which qualities are in abundance among oils and lubricants. Further, you can always use it soften your skin or stay regular.
Enjoy your Mules,
Marion
PS - I think white petrolatum will work for this purpose as well. But, as of yet, I have not tried it. M
PPS - The Strider Ranger Green and Black have also benefited from their exposure to mineral oil, not as greatly, as they already had some oil on them, but they did improve in richness of color. And a secondary benefit of the mineral oil could potentially discourage corrosion under the handle scales. M

Part III
New Colors and Slim Grips....
So, these have been out awhile, but I have simply been too busy to do anything but put fires out.... Hopefully the fine folks at Halpern Titanium are not machining pitchforks.....
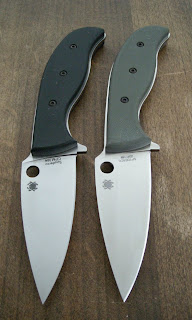
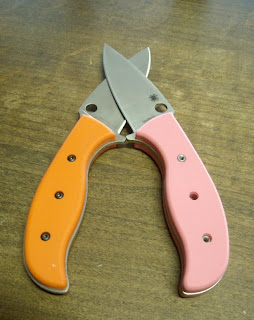
Some time back, Halpern Titanium added Pink, Gray, Light Brown and Earth Brown to their line-up of Green, Black and Orange.
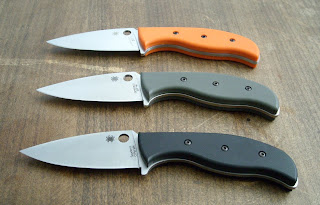
In addition to all the quality and precision exhibited by the grips I have previously reviewed, these new scales remedy the most common complaint about the first offering, as they now come very close to the edge of the scales.
And, they are also offering a Slim Grip, and the gray set of grips in my images represents that offering.
So, I will go straight to the images, and I will add some information as we go...
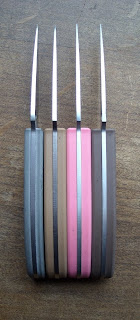
The new colors...

The new colors next to the old colors sans the black.


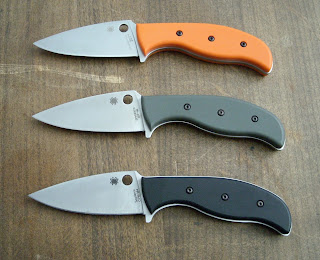
And some "stylish" images showing the an old color vs a new color, and the tang coverage difference.

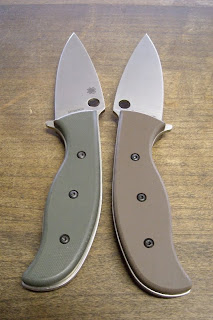

And an image showing the two Browns in comparison to the Ranger Green.

An image showing the differences in thickness between the Slim Grips, and the full thickness grips, which are similar to the first offering.
Showing the old and the new side by side...
And a stand-alone image of the Gray Slim Grips, which of the new offerings, is the one I prefer.
That's all for now, and feel free to ask any questions you might have, on one of the threads I will start.
And remember, if you like what you see, you might think about buying the scales of your choice before the next run of Mules is released, else they may not be available when you want them. Grips go fast when the Mules are let to run...
HalpernTitanium.com
Thank you,
Marion
Halpern Titanium, of Three Rivers Massachusetts a long time partner of Spyderco, met with the Spyderco Team in Golden Colorado some months past. At that meeting the Halperns were asked by Sal Glesser to turn their expertise in precision manufacturing to the task of building handles scales, or grips for the Spdyerco Mule Team Knives. And Halpern Titanium decided to offer a Mule handle scale, as it was a great opportunity that fit with their manufacturing strengths and represented another great way to collaborate with Spyderco.
Knowing nothing of this, I saw Sal mention that Halpern Titanium were looking into making grips, in a thread at BladeForums and as I have a deep interest in such things, I contacted them. Their response was swift and communicated a real enthusiasm for the project.
Within a couple days, they announced on their forum at the Usual Suspect Network that they would be making grips for the Mules. This announcement was met with real interest, as to date, they are the only company making a 'production' handle scale for the Spyderco Mule Team Knives. Within a short period, a sign-up for 20 sets was announced and sold out.
A few weeks passed, until an opening in their production schedule came around. Then, the announcement was made that they would be offering two different grip options. Option 1, dubbed, 'Ready to Use', are grips and hardware that allow the owner of a Mule, to buy handles for their Mule, install the grips in a couple minutes and then be onto the serious business of enjoying their knife, fully functional with handles. Option 2, dubbed, Do It Yourself, are grips machined for hardware, and with the perimeter or 'profile' cut, but allowing the customer to finish them in a any shape or texture that they would like. Announced at the same time, that they had decided to manufacture more than 20 sets, because they wanted to be able to offer the grips to the wider market.
Then came the day of their arrival....
We had a decent snow here, so it was a bit like Christmas. I woke up, and looked outside to find my mailbox full and my yard covered in snow. I made myself do the responsible thing, and shovel the walk first, then I could sort through the mail.
Just as I thought, the Mule Grips from Halpern Titanium were there.

And upon opening the box, I found all the contents very nicely wrapped and packaged, you could even say that they were lovingly packaged, with double bubble wrap, just to make absolutely sure that they arrived safely.

And, after separating the grips from the packaging, I was ready to go find everything else....

So, I assembled all the tools necessary, my favorite being the Husky Tools Torx Driver with all the different sizes. I also, dug through boxes to find my Spyderco CPM-M4 and ZDP-189 Mules.


Assembly went well, after just sort of going at it, I figured out that it was easiest to fasten one screw to each spacer, line one grip up with the holes in the Mule, and push the spacer with attached screw through. Then, I could hold the grip on, while placing the second grip on the other side, over the spacers. Then it was simplicity to finish the job by adding the last screws.
But, then, when I went to place the grips on my ZDP-189 Mule, I found that there was small amount of slag in the hole, that kept the spacers from going in with hand pressure, so for the sake of images, I just put those scales on my 9Cr18Mo Mule, which proved no challenge.

Later, I spoke to one of my brothers, who is much better with tools than I am... He suggested I use a hammer, and try to coax the spacers through the holes. He has a great deal of experience with such things, as he is a mold cleaner and process tech for the plastics industry. Having been given good advice, I was still a bit hesitant, because the ZDP-189 Mule is know for it's high hardness. But, starting by placing the Mule on a towel, I got the spacers into the holes with the hammer, taking care to keep the force low. Then I went out to the shop, and placed each spacer, one by one, over a hole in a piece of wood, and applied the hammer. Worked like a charm. Then, a small session of grip swapping began.

As people have seen and read more about this run of grips, there has been some concern raised about the fact that the grips do not extend out to the edge of the tang, that they are not the same size as the tang of the knife. My opinion is that given the manufacturing options Halpern Titanium was faced with, the solution they chose is a fine alternative, perfectly functional, and quite a bit less expensive than a custom-fitting.

In this situation, there are three choices a manufacturer of after-market handles for a full tang knife can make.
1. They can try to match the contours of the model as perfectly as possible, but given natural manufacturing tolerances, the grips will not match exactly. This is due to the fact that both items, the grips and and the tang of the knife can vary. This makes for a very inconsistent looking product.
2. The grips can be made larger than the tang, but then, the purchaser has to 'fit' or modify the scales to fit his knife. This makes the product a DIY project, which is the not the purpose of this option. Many customers do not want a DIY project, they want to bolt grips on, and use their knife. Honestly, I prefer a bolt-on and done product to one I have to modify before I can use. Some people are prepared to modify a product before they can use it, but I would hazard a guess that most are not.
3. Or, they make the grips smaller than the tang, which gives a finished appearance, and makes the product ready to use. This method has a strong following in the industry, being used by Chris Reeve, Benchmade and others.

I have found that having the tang proud of the handles is really no pain. The quarter inch thick scales fill the hand, and generally mute the effect of the tang sticking out. Ironically, a friend of mine came over, and I was filling him in on what was going on, and the new grips from Halpern Titanium. He picked up the knife, and said... "Oh, this is really nice. These new handles feel really good. Phenomenal!" Then, I pointed out that the handles were not flush with the steel. He had to pick the knife back up, look at it again, and said "No, what? These are great, I didn't even notice, with the way these handles fill your hand. In fact, I like the way these look. The way you can see the steel around the edges of the handle scales, really sets the handle scales off."


When they arrived, the grips were a bit pale in color. I believe this is partly due to a lubricant used in machining. Also, as a surface effect, grips such as these made of G-10 or micarta, tend to look a bit better when oiled. A common practice among knife-makers is to oil micarta, for a slightly darker appearance. This also happens naturally, with exposure to the oils of hand, with use, over time. Note - In a later conversation with Marianne of Halpern Titanium, she confirmed that it is common to oil the handles, and makes for a richer color.
As I have handled the Mules, and they have darkened with use, I really have to say that I like the color. I had expected the Strider Ranger Green to be a bit darker, but I like it.

I am very pleased with these grips. I find them to be functional in every practical way. Halpern Titanium has succeeded in providing an inexpensive and practical production handle scale option for the Spyderco Mule Team Knives.
And when you consider value, they are quite an attractive option. The least expensive Mule was $20, but the average cost for one of the Mules, has been $56, which makes the G-10 grips from Halpern Titanium pretty cheap at $25. And, with the grips being inexpensive, it makes it attractive to order an extra pair for future Mule knives, remember, we are just getting started with these Mules. I wish I had purchased a set of the Coast Guard Orange scales, as well.

If you are interested in purchasing a set of grips, in either option, please contact Melanie of Halpern Titanium at 413-283-8627, as I understand it, they have grips in stock, shipped for about $30. They had planned on making only 20 sets of handle scales, but they decided to expand the run.
And finally, just for fun, I took a group picture of all my Mules, with their handles.

Marion
PS - If you are curious about the hardware that these grips are mounted with, I have a couple images here..... http://spyderco.com/forums/showpost.php?p=544132&postcount=23
Part II
Oil your G-10 grips for best appearance.
As you may have read in my review of the Halpern Titanium G-10 grips, I mentioned that they were a bit pale in color at first, and that over time, with exposure to the oils of the hand, they would darken up. I also reported that some customer makers oil their G-10 and Micarta with Mineral Oil.
Here I have borrowed an image from my review, for this this article. It shows the pale color of the surface.

After reading my review, Marianne Halpern of Halpern Titanium confirmed that the grips would benefit visually from an application of oil, and she suggested a product called LPS TKX or the old standby WD40.
So, I decided to get some oil, and see how it worked. At the time, I was anticipating the arrival of a pair of Coast Guard Orange G-10 Grips from Halpern Titanium. I had not bought a pair of the orange, and then they were sold out, and I decided I wanted a pair. Then, a Spyderco.com Forum member, by the name of David, told me that he had bought a set of the orange, but that he was willing to part with them. And so, a deal was struck, and I waited for their arrival.
But, while I waited, I went looking for Mineral Oil.
First of all, I knew that Mineral Oil has in the past been used as a skin softener or conditioner. A jaunt over to Wikipedia will show that it's use is far more common than you might be familiar with, and that it is a close relative of white petrolatum.
So, I went to a couple stores, and after spending far too much time hanging out in the health and beauty area of my local market, stuck behind women gossiping about plucking, hair color changes and what they were to wear at their upcoming Christmas festivities, I was diverted to hardware, where I had to explain that while mineral spirits may have the word mineral in common with mineral oil, that was not what I was looking for. Strike One for Marion.
Then the day after Christmas came, and my wonderful partner and soon to be wife, needed to go shopping for supplies for our upcoming celebration. And among our adventures, I had some time at Wally World. After wandering through hardware and picking up a few things, I got focused, and headed over to the area around the pharmacy. There I found the staff very helpful, and I found a bottle of mineral oil, and at a very fine price.
Fast Forward to my return from the country, to my home, where I discovered that my Halpern Scales were waiting for me....

And, even more so than the Strider Ranger Green or the Black scales which I had already, the Coast Guard Orange grips were in need of a bit of oiling, being pretty pale, and not very rich in color.

Soon, I had very soft hands, thanks to mineral oil. And my Mule grips are wonderfully rich in color...

And images with a flash, for a bit more of the story...
Before

After

And finally, the best part of using mineral oil for this purpose is that it is, by all indications, non-toxic, and seemingly odor-less. Neither of which qualities are in abundance among oils and lubricants. Further, you can always use it soften your skin or stay regular.
Enjoy your Mules,
Marion
PS - I think white petrolatum will work for this purpose as well. But, as of yet, I have not tried it. M
PPS - The Strider Ranger Green and Black have also benefited from their exposure to mineral oil, not as greatly, as they already had some oil on them, but they did improve in richness of color. And a secondary benefit of the mineral oil could potentially discourage corrosion under the handle scales. M


Part III
New Colors and Slim Grips....
So, these have been out awhile, but I have simply been too busy to do anything but put fires out.... Hopefully the fine folks at Halpern Titanium are not machining pitchforks.....
Some time back, Halpern Titanium added Pink, Gray, Light Brown and Earth Brown to their line-up of Green, Black and Orange.
In addition to all the quality and precision exhibited by the grips I have previously reviewed, these new scales remedy the most common complaint about the first offering, as they now come very close to the edge of the scales.
And, they are also offering a Slim Grip, and the gray set of grips in my images represents that offering.
So, I will go straight to the images, and I will add some information as we go...
The new colors...

The new colors next to the old colors sans the black.


And some "stylish" images showing the an old color vs a new color, and the tang coverage difference.


And an image showing the two Browns in comparison to the Ranger Green.

An image showing the differences in thickness between the Slim Grips, and the full thickness grips, which are similar to the first offering.

Showing the old and the new side by side...

And a stand-alone image of the Gray Slim Grips, which of the new offerings, is the one I prefer.
That's all for now, and feel free to ask any questions you might have, on one of the threads I will start.
And remember, if you like what you see, you might think about buying the scales of your choice before the next run of Mules is released, else they may not be available when you want them. Grips go fast when the Mules are let to run...
HalpernTitanium.com
Thank you,
Marion
Tuesday, November 10, 2009
Cuscadi provides a Handle, Innovative and Exotic, yet Useful.
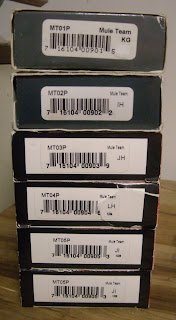
Spyderco Knives and Accessories, a ground-breaking company and leader in the cutlery industry, has introduced a project called the Mule Team knives. In a nutshell, as many of you know, the Mule Team Project is a knife, made to the exact same specifications every time, but with the steel differing with each issuance. This allows a person to experience the steel of that issue, and compare it against other steels, without any other variations clouding your comparison. But more than that, the Mule Team is a useful knife. See Spyderco's latest Mule Team, the MT05 in the Chinese steel 9Cr18Mo for more details.
But, the Mule Team knives do not come with handles or sheaths. And this necessitates that the user, supply a handle, and if the knife is to be carried, a sheath.
So, as I began to acquire the Mule Team knives, I began to look for what options had become available on the after-market.
One of the first options I discovered was a company out of Germany, called Cuscadi (http://blog.cuscadi.de/)
I had originally seen their custom handle scales for folders. I contacted them and asked if they had ever done a set of handle scales for a Mule Team. And soon I received a reply from Luke, saying that they were at that very time, planning on making a set of scales for a Mule.
I came to learn that, Cuscadi manufactures after-market handle scales for quite a few different knives. What they do is a sort of outgrowth of the "Pimp Your Knife" sub-culture, owners, knife makers, and modifiers that take a knife, and re-tool it with non-standard materials and embellishments. Cuscadi works within this corner of the market, crafting custom handle scales and back spacers out of your choice of suitable materials, with very fine machined surface effects.
In speaking with Luke,, he informed me that he was interested in classic materials, like wood, for their nobility.
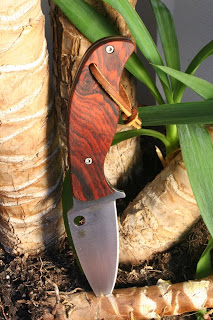
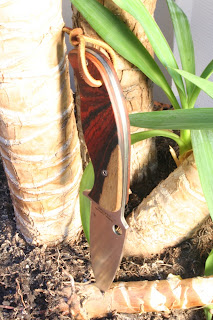
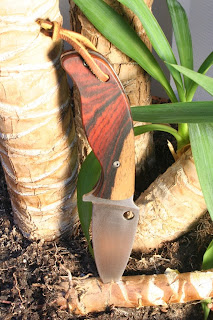
I informed him that I was interested in an 'Anso' style scale, which he told me would be no problem.
Luke, in our discussions, kept highlighting the custom nature of the service he provides. He made it clear, that if a material exists, and you can adequately describe what it is you want, he can most likely create a set of handle scales that will match your idea. This custom aspect also allows them to build scales for the first Mule, which had different hole sizes, or for the subsequent Mules.
As time came and went, he began to create a set of 'Anso' style scales for me, working from a prototype, into a finished product.

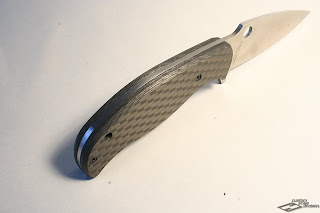
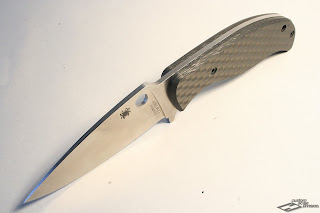
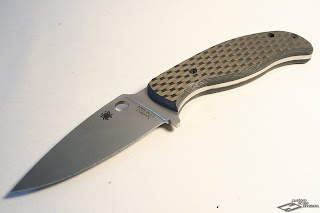
The handle scales offered by Cuscadi are bolt-on and removable. The first benefit is that you will not have to send your scales off to have them attached, Cuscadi can simply make yours and send them to you. The second benefit is that you can switch the handle scales from one Mule to another, if you so choose. With the high hardness of the 4th Mule Team knife, made of ZDP-189, the bolt-on handles of Cuscadi offer another advantage, they can be installed with very little stress applied to the blade.
Earlier, I mentioned that they offer a number of different materials and textures, but words do not convey the beauty of what Cuscadi creates.
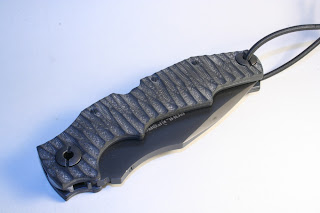


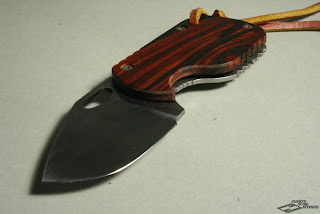

From noble woods, to the most high-tech of materials, like cera-glass and carbon fiber, Cuscadi can mate a precious material with the surface effect of your choice to create a set of handle scales for your Mule, that is uniquely yours.
Check them out, and see if they have the goods to help you get a handle on your Mule. http://blog.cuscadi.de/?p=1127
The set of scales that Luke made for me, are on their way, and I should receive them soon, and I await their arrival with great interest.
But, I will leave you with a couple more images, to whet your appetite...


Marion
Post-Script....
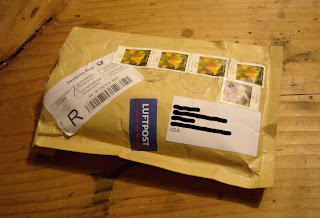
I received my Cuscadi of Germany custom handle scales for the Spyderco Mule Team knife.
A package from Germany...
The handle scales, all fastened together, so that nothing is lost.
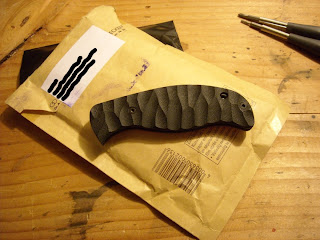
Getting everything ready for the assembly.
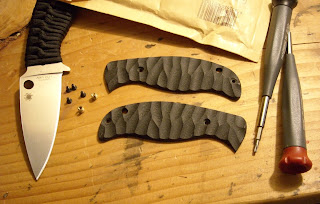

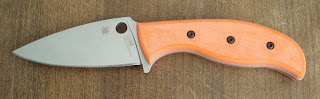
Assembled.

It was really quite exciting getting my new handle scales from Cuscadi of Germany. I was able to fasten them to the knife with no difficulty.
This knife, with it's new handle scales, has been in my pocket for about a month, and I quite like them. Great to look at, reasonably comfortable to use. So far, I feel like the Cuscadi of Germany custom handle scales represent a good value.
Marion
But, the Mule Team knives do not come with handles or sheaths. And this necessitates that the user, supply a handle, and if the knife is to be carried, a sheath.
So, as I began to acquire the Mule Team knives, I began to look for what options had become available on the after-market.
One of the first options I discovered was a company out of Germany, called Cuscadi (http://blog.cuscadi.de/)
I had originally seen their custom handle scales for folders. I contacted them and asked if they had ever done a set of handle scales for a Mule Team. And soon I received a reply from Luke, saying that they were at that very time, planning on making a set of scales for a Mule.
I came to learn that, Cuscadi manufactures after-market handle scales for quite a few different knives. What they do is a sort of outgrowth of the "Pimp Your Knife" sub-culture, owners, knife makers, and modifiers that take a knife, and re-tool it with non-standard materials and embellishments. Cuscadi works within this corner of the market, crafting custom handle scales and back spacers out of your choice of suitable materials, with very fine machined surface effects.
In speaking with Luke,, he informed me that he was interested in classic materials, like wood, for their nobility.


I informed him that I was interested in an 'Anso' style scale, which he told me would be no problem.
Luke, in our discussions, kept highlighting the custom nature of the service he provides. He made it clear, that if a material exists, and you can adequately describe what it is you want, he can most likely create a set of handle scales that will match your idea. This custom aspect also allows them to build scales for the first Mule, which had different hole sizes, or for the subsequent Mules.
As time came and went, he began to create a set of 'Anso' style scales for me, working from a prototype, into a finished product.


The handle scales offered by Cuscadi are bolt-on and removable. The first benefit is that you will not have to send your scales off to have them attached, Cuscadi can simply make yours and send them to you. The second benefit is that you can switch the handle scales from one Mule to another, if you so choose. With the high hardness of the 4th Mule Team knife, made of ZDP-189, the bolt-on handles of Cuscadi offer another advantage, they can be installed with very little stress applied to the blade.
Earlier, I mentioned that they offer a number of different materials and textures, but words do not convey the beauty of what Cuscadi creates.


From noble woods, to the most high-tech of materials, like cera-glass and carbon fiber, Cuscadi can mate a precious material with the surface effect of your choice to create a set of handle scales for your Mule, that is uniquely yours.


Check them out, and see if they have the goods to help you get a handle on your Mule. http://blog.cuscadi.de/?p=1127
The set of scales that Luke made for me, are on their way, and I should receive them soon, and I await their arrival with great interest.
But, I will leave you with a couple more images, to whet your appetite...


Marion
Post-Script....
I received my Cuscadi of Germany custom handle scales for the Spyderco Mule Team knife.
A package from Germany...

The handle scales, all fastened together, so that nothing is lost.

Getting everything ready for the assembly.


Assembled.

It was really quite exciting getting my new handle scales from Cuscadi of Germany. I was able to fasten them to the knife with no difficulty.
This knife, with it's new handle scales, has been in my pocket for about a month, and I quite like them. Great to look at, reasonably comfortable to use. So far, I feel like the Cuscadi of Germany custom handle scales represent a good value.
Marion
Subscribe to:
Posts (Atom)
